NOTE:

All the videos in this blog are High Definition Videos most with Audio. The videos are best watched in full screen with "HD option enabled". You would also find screenshots and some handy scripts for DBAs.
Showing posts with label Screen Shots. Show all posts

Tuesday, January 24, 2012

How to start a GUI session without VNC?

a)  Download  & Install "XManager", You can download a free trial version from the internet.
b) Launch the Xstart and fill in the details as below:


It opens up a window


In the Xterm window, test if the GUI is working with "xclock" utility.

Friday, November 20, 2009

Shared Memory segments and Semaphores

When you startup a database instance a shared memory is acquired equivalent to the size of the SGA. For more information of what a shared memory and semaphore is you can refer an article by Nidhi Jain at http://www.orafaq.com/node/8

So shared memory and semaphores are allocated when you start the instance and it should be de-allocated when the instance is shut down. There are times when you shutdown an instance and the OS still leaves behind shared memory and semaphores. How do we go about clearing these shared memory segments and semaphores?

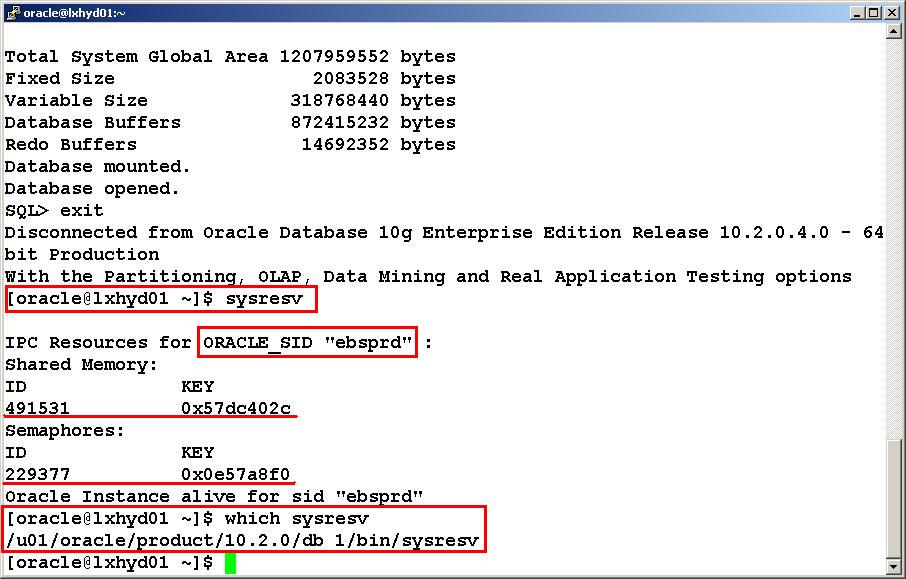
First let us see one of the tools called "sysresv" to identify the shared memory and sempahores allocated to an instance.


As you can see, we have have identified the shared memory segment id and sempahore id.
Also note, the sysresv command is in the $ORACLE_HOME/bin location, so this is a utility supplied by Oracle.

There is also an OS level utility calls "ipcs" available to view all the shared segments and semaphores allocated on that server. So let us co-relate the output of sysresv and ipcs.


ipcs -a gives much more information here like:

owner the shared memory segment,
bytes the size shared memory allocated (which is the size of SGA)
nattach is the number of processes attached to this shared memory.

As you can see in the figure below the bytes allocated is equivalent to the sga_target.


Ideally, when we shutdown an instance the allocated shared memory segment and sempahore should be released. As you can see below.


However if this does not happen, we can release the shared memory and semaphore manually by using the "ipcrm" command.

To remove the shared memory segment we use:

ipcrm -m <SharedMemory ID>

considering the above example,
ipcrm -m 491531

To remove the semaphores:

ipcrm -s <SemaphoreID>

eg. ipcrm -s 229377

For more options of ipcrm you can refer http://publib.boulder.ibm.com/infocenter/pseries/v5r3/index.jsp?topic=/com.ibm.aix.cmds/doc/aixcmds3/ipcrm.htm


Sunday, November 8, 2009

DB Clone using Grid Control


In this post I would demonstrate how to clone an Oracle Database using GRID CONTROL. The steps are pretty straight forward, however I am posting it just for the sake of familiarity - Most of the DBAs prefer to do clone the database manually (either using rman, or manual OS level copy). When cloning through grid - The agent runs the following script: $AGENT_HOME/sysman/admin/scripts/db/dbclone/db_clone.pl


1. Login to Grid Control


2. Follow the navigation "TARGETS" => DATABASES=> Click on the Source Database (ie EBSPRD in this example)


3. The working directory Location is where the source database backup files would be placed. You can choose to delete or retain the backup after the clone.


4. Since the source database is not in archive log mode, It prompts you if the database should be put in archive log mode or not? (If not, It would take the cold backup of the source).


5. The below screen shows the database file locations, by default the database files are stored in one of the directories in the $ORACLE_HOME, we don't want that..To change it hit the "Customize" button.


6. Specify the location where you want the files to be on the target.


7. Give an appropriate Description of the Job. If you want to schedule the clone later, you can do that as well.


8. You can monitor the status of the job by clicking on the "Jobs" tab on the top right hand side.


9. Incase you want to see more details of the job, just click on it.


10. Once the job completes successfully, the database is also registered in the grid control.